AI Agents
An agent component is a marketplace listing that puts a live AI agent on one of your pages — a "talk to sales" band mid-page, a chat card inside a column, or a floating help bubble in the corner. You browse the catalog, drop the listing you like onto a page, point it at an agent you've hired, and publish.
It sits in the marketplace next to templates, section components, and background videos, under the AI Agents category.
Two different tiles live in this category
Browsing AI Agents shows you two kinds of card, and it helps to know which one you're looking at:
Hireable agents. Cards for actual AI employees you can hire — each has a name, a persona, a price and a Hire button. Hiring is handled by OPVS, who run the agent and bill you for it.
Mount listings. Cards for how an agent appears on your page — the four form-factors below, plus branded skins of each. These carry no persona and nothing to hire; they are the container.
You need one of each: an agent to do the talking, and a mount listing to hold it.
The four form-factors
The form-factor decides how the agent sits on the page. Pick by where you want it to appear, not by what the agent does.
Form-factor | How it appears | Reach for it when |
|---|---|---|
section | A full-width band inside the page | You want a "talk to our team" section partway down a landing page |
widget | An inline card that fills its column | You want chat inside a layout, next to other content |
concierge | A floating button that opens a slide-out panel | You want site-wide help without giving up page space |
headless | No interface at all — just the connection and the conversation state | You're building your own chat UI in your own design |
All four render directly in your page, not in an iframe, so the agent picks up your site's colours and fonts automatically. Each mount listing also ships in several skins — the plain baseline plus branded variants — so you can match a darker or lighter brand without writing CSS.
Browsing and filtering
From the dashboard, open Marketplace → AI Agents and use the filter chips to narrow by form-factor.
Over the API and from an agent, the filter works too — but the parameter is spelled differently depending on which surface you call, and the wrong spelling is silently ignored. You get every agent back instead of a narrowed list, with no error to tell you:
# Public API — dotted, reads the agent's metadata directly
GET /api/v1/content/marketplace/components?category=agent&agent_meta.form_factor=widget

# Dashboard API — flat parameter name
GET /api/v1/dashboard/content/components?agent_form_factor=widget
The same applies to agent_meta.role / agent_role. If a filtered call returns suspiciously many results, check the spelling before you check your data.
From an agent, content_list_marketplace_components takes a plain agent_form_factor argument and translates it to the right form for you — so through MCP there is only one spelling to remember.
Creating your own listing
content_create_agent_component builds a branded listing in one call. Give it a slug, a name and a form-factor; it writes the agent element, works out the right runtime mount for that form-factor, and bakes your colours in:
content_create_agent_component
  slug         acme-sdr-widget
  name         Acme SDR
  form_factor  widget                 # section | widget | concierge | headless
  role         sdr                    # optional — sdr | support | concierge | booking
  title        Talk to sales
  subtitle     Answers in seconds
  skin         { "primary": "#5b2be7", "radius": "14px" }
One thing worth knowing if you ever hand-edit a listing afterwards: the agent's styling lives in the listing's HTML template, not in its CSS field. The agent renders inside its own isolated shadow root, and the component's CSS field never reaches it — anything you put there is dropped without complaint. content_create_agent_component puts the styling in the right place for you, and by default maps your site's own brand colours onto the agent, so a fresh listing already looks like your site.
Putting one on a page
Insert a mount listing like any other marketplace component — from the page editor's Add Section, or with page_insert_section.
Every mount listing requires a flow ID: the ID of the agent you hired. Without it the listing won't insert, and that's deliberate — a chat box with nothing behind it is worse than no chat box. Hire the agent first, take its flow ID, then mount.
So the order is always: hire the agent → mount a listing → publish → deploy.
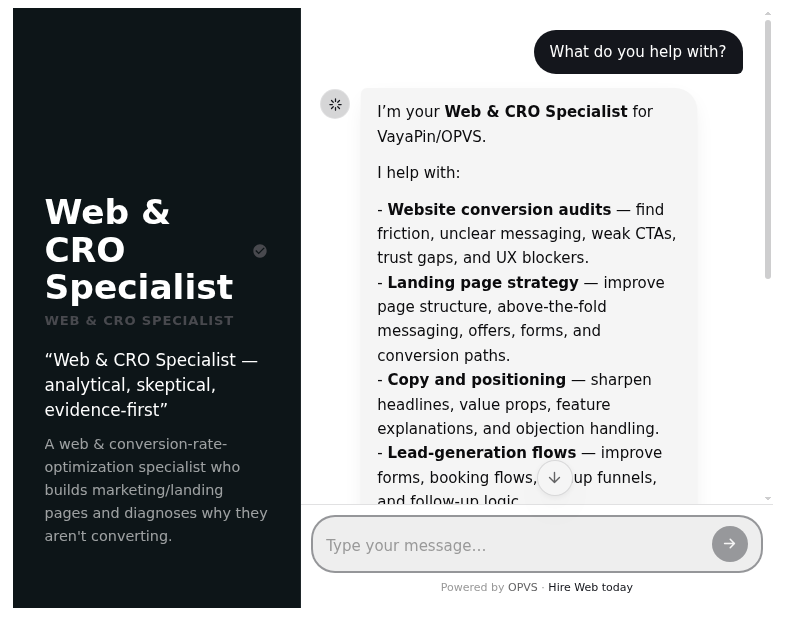
Once it is mounted and the flow ID is set, this is what a visitor gets — the agent's persona alongside a live conversation, streaming its reply as it writes:
A listing is not the agent
Two things are easy to confuse because both say "agent":
The listing is the marketplace card — the shape, the skin, the placement. You create these with
content_create_agent_componentand mount them withpage_insert_section.The agent is the thing that answers. It is hired and run by OPVS, and referenced by its flow ID.
Browsing, creating listings, mounting them and publishing are all yours to do today. The conversation itself starts working once you've hired an agent and its flow ID is on the listing.
One more setting to know about: an agent will only run on the domains it's been allowed to. If you mount an agent that works on your main site and it stays silent on a second domain, that domain needs adding to the agent's allowed list — the mount is fine.
Next steps
Match the agent to your palette in Themes.
Browse the rest of the catalog in Marketplace.
Insert and arrange the listing like any other block — see Components.
Push the page live with Deploy.